Friday, January 27, 2012

Country Chicken Girl's Bathroom Remodel

Well peeps, I can finally show you my master bathroom remodel that I started in September 2009 and FINALLY finished this month...  January 2012.  I can hardly believe it took that long to finish one remodeling project.

Let me explain before you think that I am the world's slowest remodeler or whatever you want to call it.  I am not, but my trim-man, Dan the Trim-Man is the biggest procrastinator that I know when it comes to finishing certain projects, and most all of my projects that he gets roped into helping me with fall into that category.  Sorry honey, but it's true... don't make me mention the master bedroom.

It didn't take me too long to remodel the bathroom, but it took forever to get Dan the Man to finish the trim and I could not take pictures and post them on my blog until the trim was done.  Period.

So let's back up and I'll tell you what I was dealing with.

  1. We live in a double-wide trailer house.  I like to say mobile home, it sounds a little nicer, but the fact is that it is a trailer house.
  2. Our trailer house has ugly disgusting wall board in every room.
  3. The master bathroom had carpet in it.  I hate carpet in bathrooms.
  4. We had water damage on the ceiling that looked gross and was embarrassing for me.
  5. We had two GIGANTIC mirrors in the bathroom that made we want to puke every time I had to look at myself naked in them.  What a harsh reminder that I no longer have the body of a 20 year old.  Egads...  what happened???
So, it was time to remodel.  I actually have been trying to remodel the whole house, but as we all know, that takes time and money.  Two things I always find myself short of.

I did this remodel on a very modest budget...  probably didn't spend more than $500 dollars on it.  I can't be sure because it was so long ago that I bought every thing I can't remember the cost.  Here is a list of what I spent money on and how much I spent as best as I can remember:

  • New laminate flooring, got on clearance and I think I spent about $125 or so on that.
  • New counter for vanity.  Don't remember, but it wasn't much.
  • New sink and faucet, around $100 for both on eBay.  I think the sink is what "makes" the bathroom.
  • Paint and Primer for walls and cabinets.
  • New hardware (pulls and hinges) for the cabinets.
  • New light fixtures and towel bar.
So without further ado...   Here are the pictures!


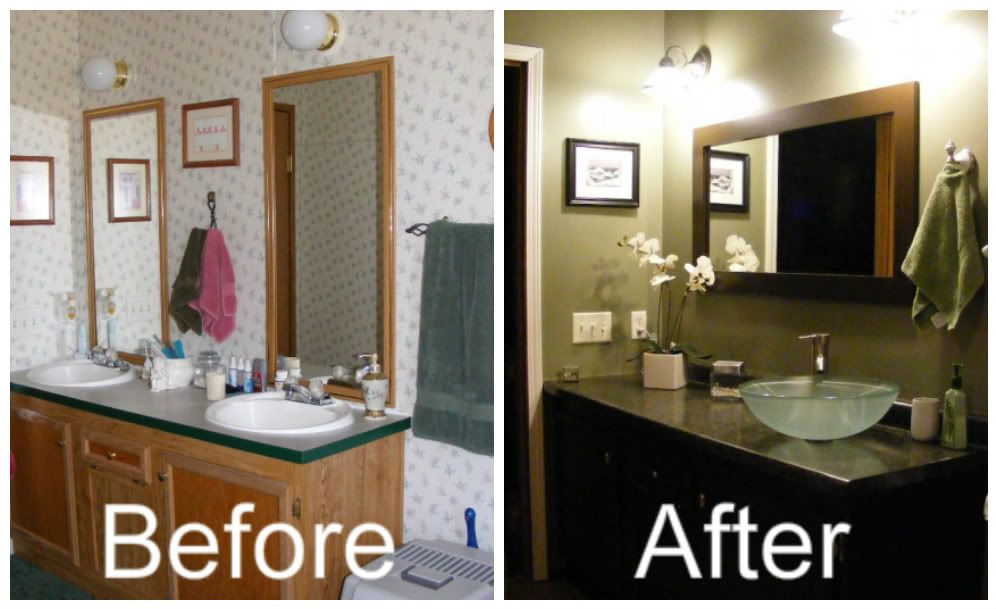
I painted the cabinet an espresso color and added new knobs and hinges, new counter top, new sink and faucet.  We didn't really need two sinks.  I like the extra counter space the one sink provides.  As for the two mirrors...  I turned one sideways and Dan the Man made a frame for it which I painted the say color as the cabinets.  New light fixtures too although they are hard to see in the picture.


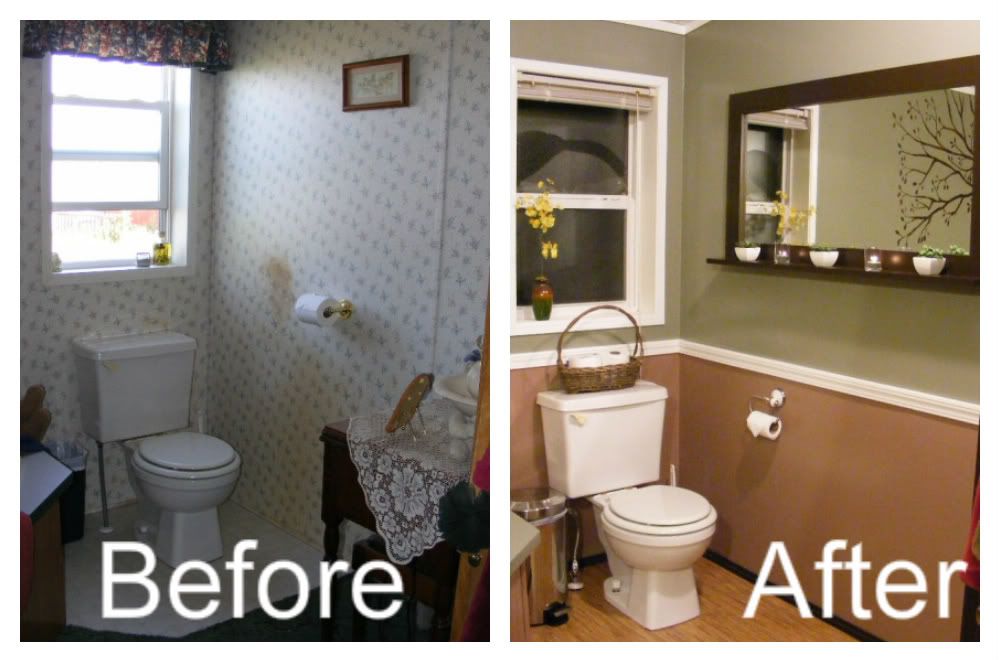
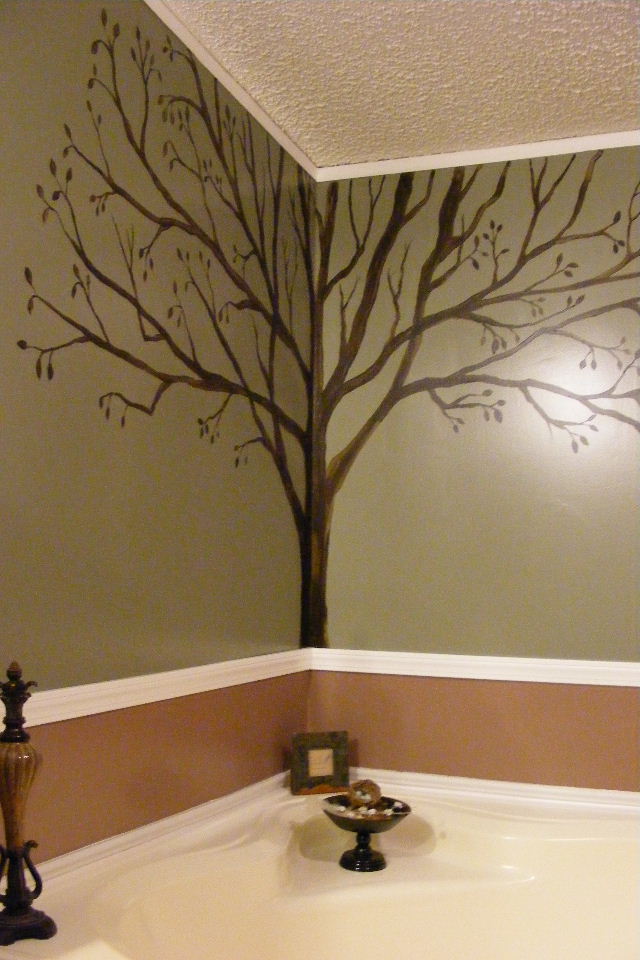
I got rid of the hideous mirrors around the tub and painted the tree!  Also painted the bathtub surround thing.  Notice the nice new flooring not the gross green carpet.  Oh and Sammi wanted to be in the picture too!


I added a chair rail to separate the two new colors.  And here is the other mirror that was over the vanity, again turned the other way with a frame and also a little ledge that Dan the Man made, painted the same color as the cabinets.

Here are some more pictures of before and after.


 Never mind the broken window...  that's still from the July storm.
The outside pane is broken, not the inside.
Don't worry, we are not living with a completely busted out 
window in our bathroom.


I took this picture so you could kind of see the shower which is situated
to the right as you come in the door.
Almost impossible to get a picture of it.


 Painted cabinets... so much better.


Well, there you have it!  I LOVE it!!  If you want more details on products that I used or how I did anything, don't hesitate to ask in the comments.  If you'll excuse me now... I think I shall retire to the spa and soak in the tub for a while!

Saturday, January 14, 2012

Country Chicken Girl to do Cooking Demonstration


I should have posted this earlier...

but I just didn't think about it.

Anyway...  I am doing my first cooking demonstration, no I take that back, this will be my second cooking demonstration, today at the Scottsbluff Winter Farmers' Market.  You can see the little poster below for details.  If you are in the area I hope that you'll come see me!

One friend wished me luck on Facebook.  I'm going to need it because when I get nervous, I usually do goofy things, so it could be humorous as well as informational.  But I know by God's grace...  I will get through it.  I don't need no stinkin' luck!

This demonstration will be for all you girls and boys who do not know how to cut up a chicken.  For all you cheaters who buy packages of frozen chicken breasts...  You know who you are.  Just kidding...  I use to do that too, I am not judging you, but I do want you to know that there is an alternative...  You know a chicken has more to it than just the breast meat.  And actually...  I think the breast meat is the least flavorful... the flavor is in the dark meat.  That's just my own opinion.

I will be giving away one of Open A Bar 2 Ranch, LLC's pastured chickens to some lucky participant.  And to make things fun, I am going to auction off one of the dishes I will be making, Artichoke-Olive Chicken Bake, which the winner will be able to take home and bake for dinner.  The proceeds from the auction will be donated to Camp Grace, our featured non-profit for this week's market.

Beth Everett of Meadowlark Hearth CSA and Maddy Soule of Soule Organic Farm & Ranch will be doing a cooking demonstration today also! They are making brats and sauerkraut! Ummmm.... I can smell it now! Their demonstration will follow mine.

Should be a good time!!

I'll try to get pictures and maybe even a video, but you know I am usually the picture taker so I'll see if I can find someone who is willing.  Dan the Man will be manning our booth so he won't be able to take the pictures, which might be a good thing.  Some of us know picture taking is not one of his strong suits!  (But you know I still love you honey!  I didn't marry you for your photography, I married you because I could say you are Dan, my man!  My Man Dan!  Dan is my man!  Okay I'll stop now).

Hope you'll come if you can!


Thursday, January 12, 2012

Ooo La, La... Cream Puffs


I can not believe cream puffs, such a decadent looking and scrumptious dessert are so easy to make!  I just have to share with everyone!

On Sunday, Skyler asked me if I could make dessert for a luncheon at school.  He is usually assigned to bring the dessert because I actually like to make desserts and usually don't buy the kiddie cupcakes at Wal-mart!  He needed the dessert on Tuesday, so I had several days to think about what I was going to do but I didn't need to think long about it, I already knew what I wanted to do...  a Cream Puff Tower!

I saw the idea some where... now where was it???  I started combing through all my recent issues of various magazines that I subscribe to.  I look and look... and look and look... and look some more.  I start to panic, because I am so obsessed with the idea of the cream puff tower that nothing else will suffice!  After I had combed through about 12 magazines, I needed to take a break.

I picked up my Kindle, my new play toy that I absolutely love.  Love, love, love!  I love my Kindle!  I am scanning through the carousel, which is kind of like your book shelf.  It shows all that you have on your Kindle when all of the sudden I spy a Country Woman magazine that I had downloaded.  "That's it!" I scream!  Gleefully I start flipping through the pages of the magazine.  I know it has to be in here some where.  And it was.  Oh happy day!

They sounded almost too easy to make.  I posted on Facebook that I was going to try my first attempt at making cream puffs.  One friend had commented that the only kind she has ever seen were the frozen ones from the grocery store.  I was in this same category and I love those little balls of fluff and often buy them.  A few other friends, including my mother-in-law assured me they were easy and a few offered to be taste-testers.

Well, I sure hoped they were easy and turned out, because I did not have a back-up plan and the dessert needed to be delivered to the school in less than 3 hours.  I actually used two recipes... the original one I am posting below and the one from my vintage Better Homes & Gardens (red checked) cookbook.  I was just using the BH&G cookbook as a reference.  I trust the BH&G cookbook and wanted to make sure I was doing it the way they said to.  The BH&G cookbook also has pictures.  I like pictures!

So with both cookbooks, I felt prepared.  I followed the ingredients from the Country Woman recipe, but tried to follow the mixing technique from the BH&G recipe.  The BH&G recipe told me to stir the batter with a wooden spoon, but let me tell you...  that wasn't going to happen!  After stirring the first egg in with a wooden spoon, the batter was a globby, stiff mess and I was running out of breath with 4 more eggs to go.  I abandoned this idea and threw the batter in my Kitchenaid mixer and let it do the work.  Don't try to stir with the wooden spoon...

I got the batter done, it was so easy once I switched to the mixer, and dropped the batter onto the greased baking sheet just as the recipe said.  Oh, and I also tasted the batter and it tasted like ...flour and eggs, not very pleasurable on the palate.  I was thinking...  shouldn't there be sugar or something in this batter to make it taste good?  Oh well, into the over my little puffs went and the timer was sent for 20 minutes.

I looked after about 5 minutes and my little puffs still looked like dumpy little blobs of batter.  I was a little concerned, but had faith that they would "puff."  After 25 minutes they were golden brown little puffs!!  I removed them and cut the small slit in them for the steam to escape.  I needed about 60 puffs, so I had to make two batches of them which made about 80 puffs.

The Country Woman magazine said to fill them with creme de menthe flavored whipped cream.  I didn't really think I needed to serve creme de menthe whipped cream at school, so I decided to fill half of them with white chocolate pudding (just the box kind) and the other half with caramel flavored whipped cream.  For the caramel flavored whipped cream I just added a little caramel flavored syrup (the kind you put in coffee drinks) to the whipped cream.  Easy peesy!

I assembled the tower as per the recipe and drizzled it with chocolate glaze!  I must say it was a success!  You should try it if you ever need a fancy-smacy dessert sometime!


Cream Puff Tree

1-1/4 cups water
2/3 cup butter, cubed
1-1/4 cups all-purpose flour
5 eggs

FILLING:
2 cups heavy whipping cream
1/3 cup green creme de menthe

GLAZE:
1/3 cup butter, cubed
2 oz. unsweetened chocolate, chopped
2 cups confectioners' sugar
1-1/2 tsp. vanilla extract
3 to 6 Tbsp. hot water
Additional confectioners' sugar, optional

1.  In a large saucepan, bring water and butter to a boil.  Add flour all at once and stir until smooth ball forms.  Remove from the heat, let stand for 5 minutes.  Add eggs, one at a time, beating well after each addition.  Continue beating until mixture is smooth and shiny.  Drop by rounded teaspoonfuls 2 in. apart onto greased baking sheets.

2. Bake at 400 degrees for 20-25 minutes or until golden brown.  Remove to wire racks.  Cut a small slit in the side of each puff to allow steam to escape.  Cool puffs.

3. For filling, in a large bowl, beat cream until soft peaks form.  Fold in creme de menthe.  Pipe about 1 Tbsp. into each puff.  Refrigerate for up to 2 hours.

4.  For glaze, in a small saucepan, combine butter and chocolate.  Cook and stir over low heat until melted.  Remove from the heat.  Stir in the confectioners' sugar, vanilla and enough water to make desired consistency for dipping.

5. To assemble tree:  Separate puffs according to size and shape, choosing the flattest ones for the bottom layer and the smallest ones for the top.  For bottom layer, dip the bottoms of the 21 flattest puffs into glaze.  Place on a 10-in. round serving platter, forming a solid circle.

6.  For the second layer, dip glaze on the bottoms of 15 puffs, them position on base layer.  Continue building the tree, using about 11 puffs in third layer, about six puffs in fourth layer, about four puffs in the fifth layer and one puff on top.

7.  Drizzle remaining glaze over tree, thinning with hot water if necessary.

8.  Loosely cover tree with plastic wrap and refrigerate for up to 2 hours.  Just before serving, dust with confectioners' sugar if desired.


And last but not least...  ENJOY!

Sunday, January 1, 2012

Something is Different...

Something is different with this picture.  Can you tell what it is?


Hint:  Something is missing.


Danny and Squeakers:  Sunday, January 1, 2012 1:06 pm


IMAG0174


IMAG0175
You have to admit Squeakers is pretty darn cute tucked under
Dan the Man's arm.  She won't let anyone else hold her like this.
Only her daddy.